

How To Connect Canon Camera To Computer Using Wifi
Solution
Getting started
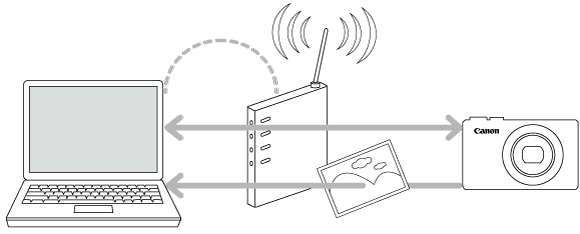
To connect the photographic camera to the calculator using the Wi-Fi function, confirm that the computer is connected to an admission point (Wi-Fi router).
IMPORTANT
The position and shape of the operation buttons, screens displayed, and setting items may differ co-ordinate to the model y'all use.
Footstep 1: Preparing necessary items
i. Cheque the computer`due south requirements.
For the estimator environments supporting Wi-Fi connection part, refer to the Related Information section at the end of the page.
IMPORTANT
- Windows 7 Starter and Habitation Basic editions are non supported.
- Windows vii N (European version) and KN (S Korean version) require a separate download and install of Windows Media Feature Pack.
2. Ostend that an admission point base unit (Wi-Fi router, etc.) is connected to the calculator.
3. Make sure that the included CameraWindow software is installed.
Notation
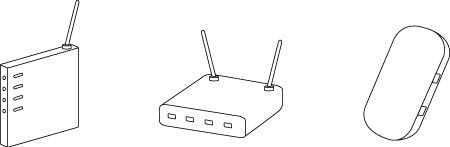
- A router is a device that creates a network (LAN) construction for connecting multiple computers. A router that contains an internal wireless function is chosen a wireless (LAN) router.
- This page volition refer to all wireless routers and base stations as "access points".
- When unsure of your figurer setup, refer to the user manual provided with the computer.
Step 2: Setting up the computer (Windows only)
Even if your figurer is connected to an access point, sending images from the camera to the computer requires changing the computer`southward settings. The procedure is explained below.
Windows seven users, keep to 2A: Windows seven
Windows eight users, proceed to 2B: Windows 8
Mac users, proceed to Step three: Connecting the camera to a computer.
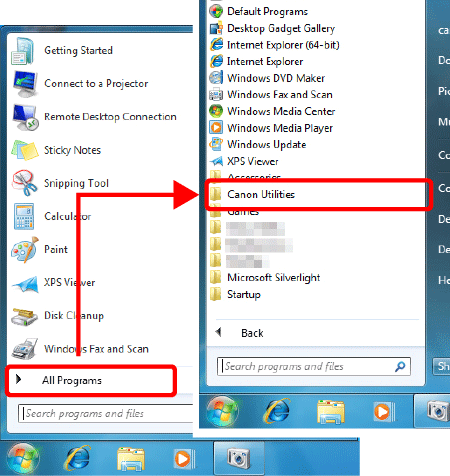
- 2A: Windows 7
1. In the Starting time card, click [All Programs] > [Canon Utilities].
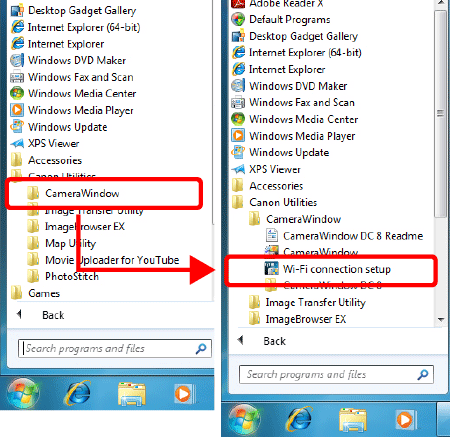
two. Click [CameraWindow] > [Wi-Fi connection setup].
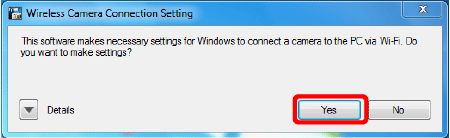
3. Click [Yes].
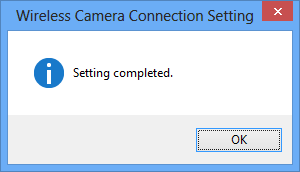
4. The following screen appears.
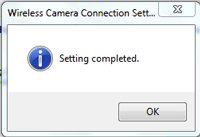
This concludes the steps for connecting a estimator to a wireless LAN.
- 2B: Windows viii
2B-i.  Move the pointer to the bottom correct of the screen to display the Charms Bar, and and then
  select [Start].
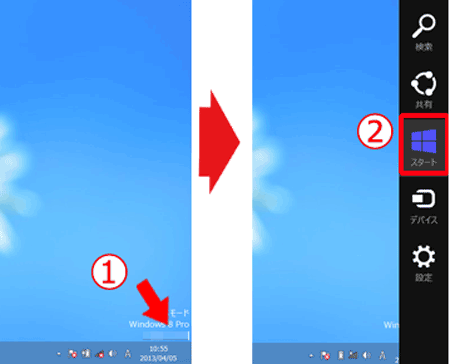
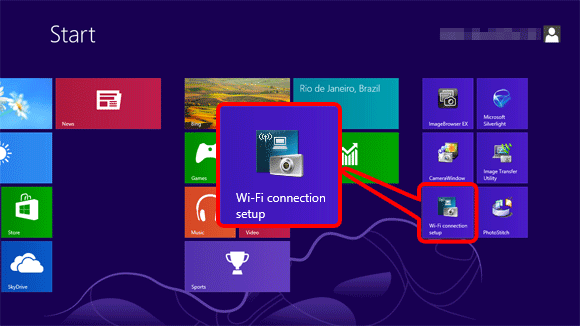
2B-2. Click [Wi-Fi Connection Set-upwardly] on the Offset menu.
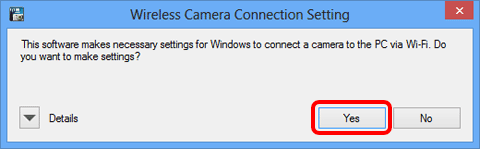
2B-3. Click [Yes].
2B-4. The following screen appears.
This completes the Wi-Fi setting procedure for the computer.
Proceed to Step three: Connecting the camera to the calculator
Footstep 3: Connecting the camera to the calculator
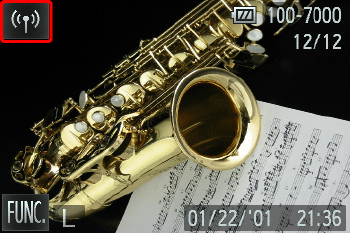
1. Printing the <Playback> ( ) button to turn on the photographic camera.
2. Touch [Wi-Fi].
NOTE
When setting upwardly Wi-Fi for the first time, the photographic camera nickname registration screen will be displayed.
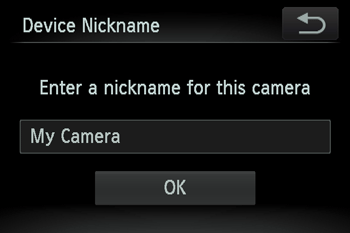
This nickname volition be displayed on the screen of target devices when connecting to other devices via Wi-Fi. Touch within the frame and then enter a nickname (up to 16 letters and numbers) with the displayed keyboard.
three. Touch < ><
>< > or drag up or downwards across the screen and touch [
  ].
].
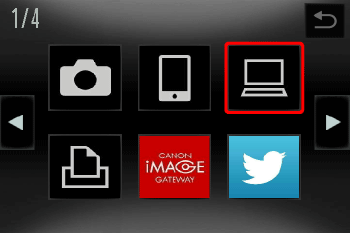
iv. Elevate up or down across the screen to choose [Add a Device].
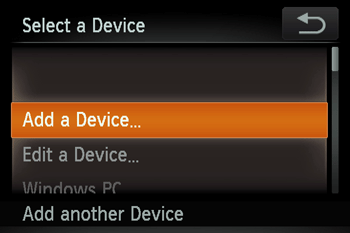
Note
One time a computer is added, the computer proper noun will exist displayed on the screen in 4. To connect to a figurer once again, simply choose the calculator name from the list.
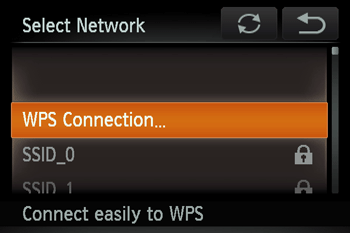
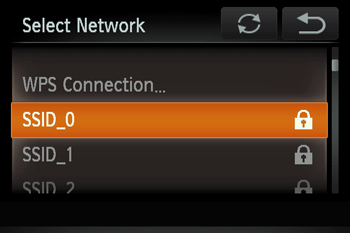
5. A listing of detected access points will be displayed in the [Access Point Connect] screen.
Apply the following method to connect with an access bespeak.
Notation
- WPS makes information technology easy to complete settings when connecting devices over Wi-Fi. You can employ either Push Push Configuration Method or PIN Method for settings on a WPS supported device.
- Refer to the user guide provided with your access indicate to check if information technology supports WPS.
- 5A Connecting to a WPS Supported Access Bespeak
5A-1. Drag up or down across the screen to choose [WPS Connexion].]
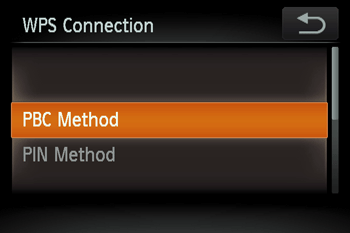
5A-2. Touch [PBC Method].
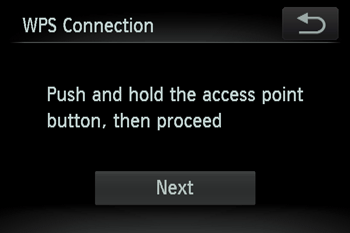
5A-three. On the admission betoken, hold down the WPS connection push for a few seconds, and so bear upon [Adjacent].
- The camera will connect to the admission point.
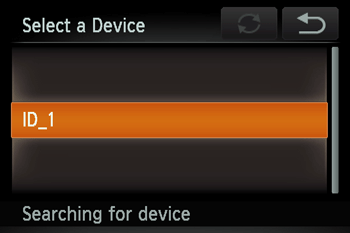
- A list of computers continued to the access point will appear in the [Select a Device] screen.
Annotation
A WPS connectedness button is affixed to your access signal (Wireless LAN, router, etc.). For further details on the location and how many seconds to press it, refer to the user guide included with your admission point.
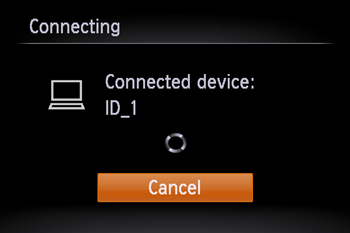
5A-4. When a connectible device is found, a screen similar the one below will appear.
Touch the name of the computer you want to connect with.
A screen like the one below will appear.
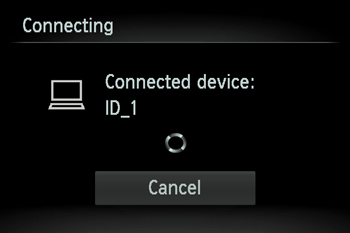
•If you lot are using Mac or Windows with the drivers installed, the screen will plow off afterwards the connection is terminated.
Please proceed to Step 4: Sending images to a computer.
•For Windows users, when connecting your camera to your computer wirelessly for the showtime time, the display will not modify during connection.
Please proceed to 6. Driver Installation.
- 5B Connecting to Access Points in the List
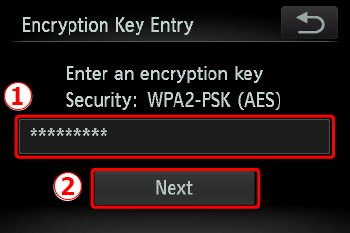
5B-1. The access bespeak`south encryption key is necessary for connection. Refer to the user guide included with your access bespeak to look up information on the encryption key.
Annotation
- An encryption cardinal (network primal) is the key used when encrypting data during wireless transmission.
5B-2. Drag up or down across the screen to cull an access point.
5B-3. Touch the input field, enter the encryption cardinal with the displayed keyboard, and so touch [Next].
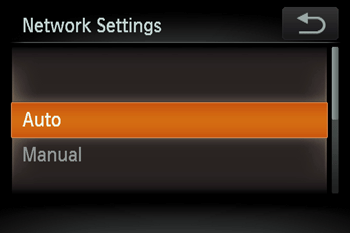
5B-iv. Touch [Auto].
5B-5. A list of other devices connected to the access point will announced.
Touch the name of the computer you want to connect with.
A screen like the one below will appear.
•If you are using Mac or Windows with the drivers installed, the screen will turn off later on the connectedness is terminated.
Please proceed to Footstep iv: Sending images to a computer.
•For Windows users, when connecting your camera to your computer wirelessly for the first time, the display will not change during connection.
Please continue to six. Commuter Installation.
- 5C Connecting to an access point manually.
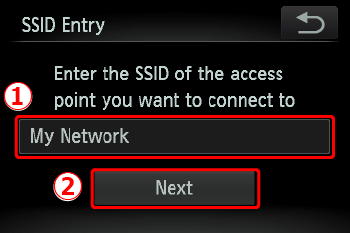
5C-1. The access point`s SSID, security method, and encryption central are all necessary for connexion. Refer to the user guide included with your access indicate to wait upwards data on SSID, Security method/encryption method, and security keys.
Note
- SSID-Numbers and messages used to place a specific existing access signal. This is besides called the "access point name" or "network proper noun".
- Security method/encryption method is the method for encrypting data during wireless manual.
- Encryption central (network central) is the key used when encrypting data during wireless manual.
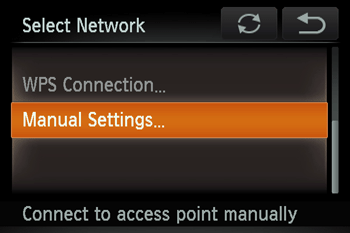
5C-2. Drag up or downwards across the screen to choose [Manual Settings].
5C-3. Touch the input field, enter the SSID primal on the displayed keyboard, and then affect [Adjacent].
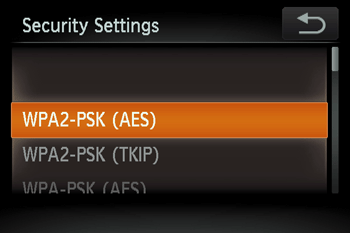
5C-4. Choose the Security method.
5C-five. Touch the input field, enter the encryption central on the displayed keyboard, and then bear on [Side by side].
5C-6. Bear on [Auto].

5C-vii. When a device is found, a screen similar the post-obit volition appear.
Touch the proper noun of the computer yous want to connect with.
A screen like the one below will appear.
•If you are using Mac or Windows with the drivers installed, the screen will turn off after the connection is terminated.
Please proceed to Step 4: Sending images to a computer.
•For Windows users, when connecting your photographic camera to your figurer wirelessly for the first time, the display will not change during connection.
Please proceed to 6. Driver Installation.
6. Driver Installation (Windows Merely)
When wirelessly connecting the camera to a computer for the offset fourth dimension, it is necessary to install the drivers using the post-obit procedure (Windows Only).
7. Make sure the below screen appears on the camera`due south brandish.
Windows 7 users: Please proceed to Footstep 7A: Windows 7.
Windows 8 users: Please proceed to Step 7B: Windows 8.
7A-i. Windows vii
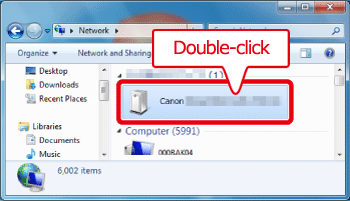
When the screen in step vii is shown on the camera's LCD panel, click the computer'due south Start menu and choose [Command Panel] > [Network and Internet] > [View network computers and devices], so choose the continued camera from [Other Devices] and then double click the camera icon. Driver installation volition begin.
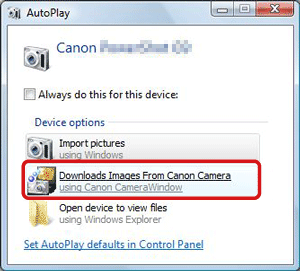
7A-two. After driver installation is complete, and the photographic camera and computer connection is enabled, the AutoPlay screen will be displayed.
Nothing will be displayed on the camera screen.
Click [Download Images From Catechism Camera].
7B-ane. Windows 8
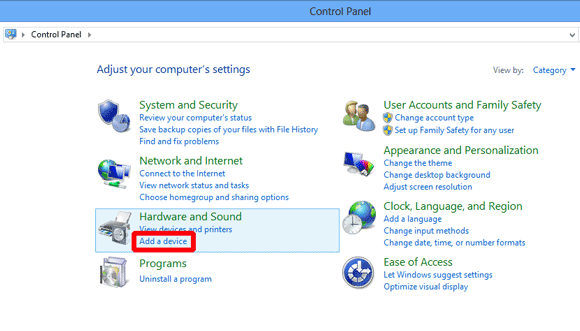
When the screen in step 7 is shown on the camera's LCD console, move the computer's pointer to the lesser correct side of the desktop to display the Charms Bar, and then click [Settings] > [Control Panel] > [Add together a Device].
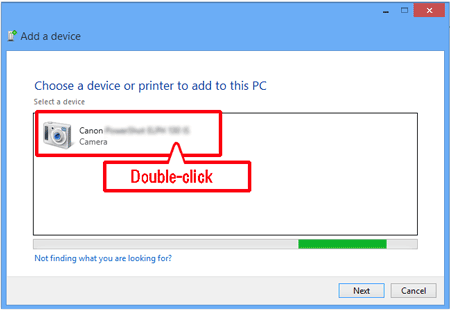
7B-2. The camera's icon will be displayed in the [Add together a device] screen.
Double-click the icon to begin driver installation.
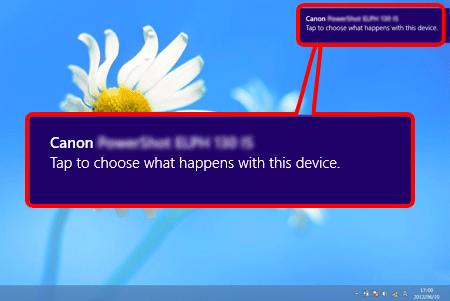
7B-3. When the connection between the camera and the reckoner has been established, a screen like the following volition appear.
Click [Tap to choose what happens with this device.]
Goose egg will be displayed on the photographic camera's LCD panel.
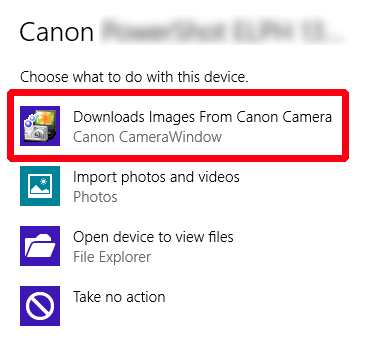
7B-4. Click [Downloads images from Canon photographic camera].
Footstep 4: Sending images to the figurer
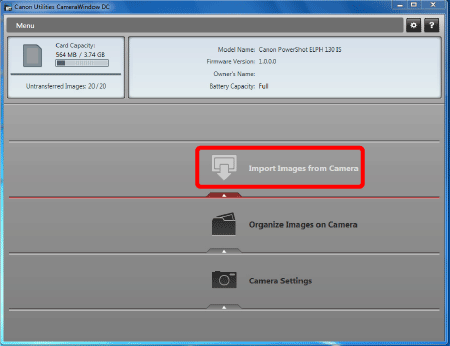
1. The CameraWindow carte window will be displayed, so click [Import Images from Camera].
2. A window similar the one shown below will appear, so click [Import Untransferred Images], [Select Images to Import], or  [Import All Images].
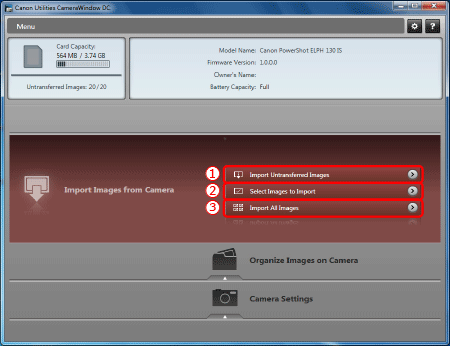
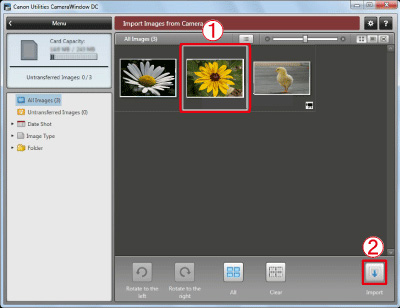
3. If you chose [Select Images to Import] in Step ii, select the images yous want to import, and then click [Import] ( ).
).
four. The post-obit window will appear, and the computer volition start to transfer images from the photographic camera.
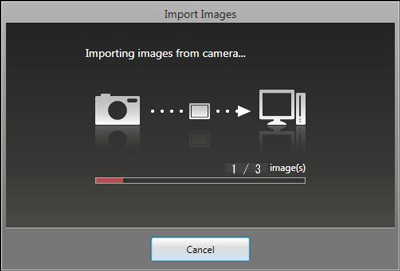
v. Click [OK].

Note
- Click the (
 ) button to shut this window. A related application ([ImageBrowser EX] by default) will offset automatically and the imported images are displayed.
 - CameraWindow default settings will salvage images to the Pictures or My Pictures folders on a computer.
- Movies volition take longer to import since the file size is larger than still images.
- To disconnect from the camera, plow off the camera.

Source: https://tw.canon/en/support/8201827200
Posted by: gonzalezdoemon.blogspot.com
0 Response to "How To Connect Canon Camera To Computer Using Wifi"
Post a Comment